Where to Rent Trekking Gear for the Satopanth Lake Trek?
Introduction
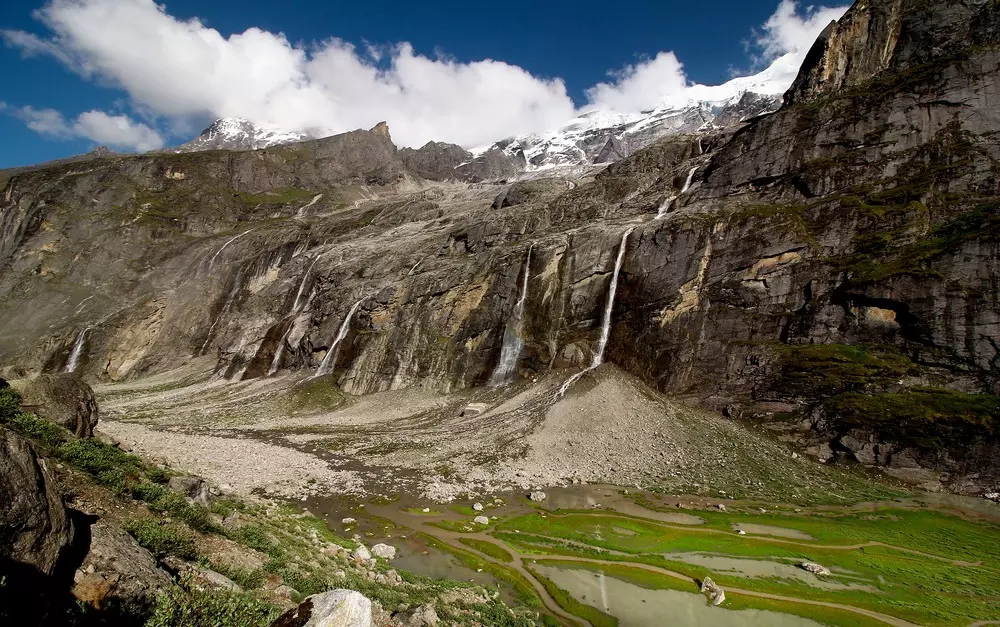
I still remember the mix of excitement and anxiety before attempting the Satopanth Lake trek. This high-altitude trek, nestled in the Garhwal Himalayas of Uttarakhand, is not just physically demanding but also mentally challenging. At an altitude of 4,600 meters (15,092 feet), it requires stamina, patience, and careful planning. Since I was a beginner, I knew that without proper preparation, things could get really tough.
The good news? With the right strategies, I was able to complete this stunning trek without extreme exhaustion or altitude sickness. It wasn't easy, but it was absolutely worth it. If you're a beginner dreaming of experiencing the beauty of Satopanth Lake, let me share everything I learned to make your journey easier and more enjoyable.
1. Understanding the Satopanth Lake Trek
Why This Trek Is Challenging
Before setting off, I spent time researching the biggest challenges of the trek. Understanding these challenges helped me plan better and mentally prepare for what was ahead. Here are the main difficulties that trekkers face:
- Altitude Sickness: As you ascend beyond 3,000 meters, the air gets thinner, and oxygen levels drop. This can lead to dizziness, headaches, nausea, and fatigue.
- Long Trekking Hours: Each day required me to walk for 6-8 hours on steep and uneven terrain. The paths were often covered in loose rocks and scree, making them tricky to navigate.
- Remote Location: The Satopanth trek is in a secluded area with no proper roads, no network coverage, and very few settlements. If something goes wrong, you have to rely on your guide and group.
- Harsh Weather Conditions: The temperature at higher altitudes fluctuates quickly. One moment, it's sunny; the next, cold winds and sudden snowfall can make things difficult.
Understanding these challenges helped me mentally prepare and ensure I had the right gear, fitness level, and support system before starting the trek.
Best Time to Visit
I planned my trek in September, after the monsoon, when the skies were clear and the trails were relatively dry. However, the best time for beginners is:
- May to June – Summer months with pleasant temperatures and clear skies.
- September to October – Post-monsoon season with breathtaking views and stable weather.
Avoid trekking in winter (November-April) because heavy snowfall makes the trail almost impassable for beginners.
2. How I Prepared Physically
Fitness and Stamina Building
I quickly realized that trekking is not just about walking long distances—it’s about endurance, strength, and breathing efficiency. To make sure my body could handle the trek, I started preparing six weeks in advance with:
- Cardio Exercises: Running, cycling, and stair climbing helped improve my stamina and lung capacity.
- Leg Strength Training: I focused on squats, lunges, and step-ups to strengthen my legs, which would take the most strain during the trek.
- Core and Back Strengthening: Since I’d be carrying a backpack, I did planks and back exercises to prevent soreness.
- Breathing Techniques: Practicing pranayama (deep breathing) helped me adjust to high-altitude conditions.
Test Hikes Helped Me
A crucial part of my preparation was doing short weekend treks to practice trekking with my gear. This helped me break in my boots, test my backpack weight, and understand how my body reacted to long hours of walking. By the time I started my trek, my legs were stronger, and I had more confidence in my endurance.
3. Packing Smart: What I Carried
Essential Gear
Packing the right gear was crucial in making my trek comfortable and safe. A heavy backpack would slow me down, so I packed only the essentials:
- A 40L backpack – Large enough to carry my essentials but light enough to avoid straining my back.
- Waterproof trekking boots – They provided ankle support and grip on rocky terrain.
- Trekking poles – A lifesaver for balance and reducing strain on my knees during steep descents.
- Sleeping bag (rated for sub-zero temperatures) – Nights at high altitude get freezing cold.
Clothing Layers That Saved Me
Since the weather could change in an instant, layering was key. Here’s what I wore:
- Base Layer: Moisture-wicking thermals to keep my body warm.
- Mid Layer: A fleece jacket for insulation.
- Outer Layer: A windproof and waterproof jacket to protect against cold winds and rain.
- Accessories: Woolen gloves, a cap, and thick socks to keep my extremities warm.
Packing smart helped me stay comfortable, warm, and prepared for any weather.
4. Finding the Right Guide
Why I Chose a Trekking Group
Initially, I considered trekking solo, but I quickly realized that hiring a guide was the best decision. Here’s why:
- Navigation: The trails are not always well-marked, and getting lost would be dangerous.
- Altitude Management: A good guide knows how to recognize and handle altitude sickness symptoms.
- Safety: In case of an emergency, I knew I had an experienced person to rely on.
The Benefits of Having an Experienced Guide
My guide helped me pace myself and provided motivation and moral support when the trek felt overwhelming. He also shared fascinating stories about the spiritual and mythological significance of Satopanth Lake, which made the journey even more special. Want to experience the Satopanth Lake trek without stress?
Check out The Searching Souls, known for providing top-notch trekking experiences. They handle everything from permits and accommodation to expert guidance, ensuring a smooth and enjoyable trek for beginners and seasoned trekkers alike.
5. Dealing with Altitude Sickness
How I Avoided It
I was most worried about altitude sickness, but I took the following precautions to stay safe:
- Slow Ascent: Rushing increases the risk of altitude sickness. I took my time and acclimatized properly.
- Hydration: I drank 3-4 liters of water daily to keep my body functioning well.
- Eating Light, Nutritious Meals: I avoided heavy foods and stuck to carbohydrates and high-energy snacks.
Recognizing and Responding to Symptoms
Even with all the precautions, I knew that if I experienced dizziness, headaches, or nausea, I needed to rest immediately. If symptoms got worse, the best solution would be descending to a lower altitude. Thankfully, my preparation worked, and I didn’t face any severe issues.
6. Eating Right and Staying Hydrated
What Kept Me Energized
One of the biggest mistakes I made on my first trekking trip was not paying attention to my diet. I learned that what you eat plays a crucial role in maintaining your energy levels, especially at high altitudes. Since food options are limited on the trek, I had to plan and pack wisely.
I carried high-energy foods that were lightweight but packed with nutrients:
- Energy bars, dry fruits, and nuts – Perfect for quick snacks between trekking stretches.
- Instant oats and soups – Easy to prepare at high altitudes and kept me warm.
- Dark chocolate and jaggery – Provided instant energy when I felt exhausted.
Eating small, frequent meals helped me maintain steady energy levels instead of feeling bloated or sluggish.
Drinking Water Smartly
Staying hydrated at high altitudes is more important than you think. Dehydration not only makes you feel weak but also increases the risk of altitude sickness. I made sure to:
- Drink at least 3-4 liters of water daily (even when I wasn’t feeling thirsty).
- Carry a hydration bladder – This was more convenient than stopping to pull out a bottle.
- Use electrolyte tablets to maintain salt balance and prevent muscle cramps.
By focusing on proper nutrition and hydration, I had better stamina and fewer headaches during the trek.
7. Walking Smart and Using Trekking Poles
Techniques That Helped Me
At first, I thought trekking was just about walking, but I soon realized that how you walk makes a big difference. Small changes in my walking technique helped me conserve energy and reduce strain on my legs.
Here’s what worked best:
- Taking small, steady steps – Instead of rushing, I maintained a slow and consistent pace.
- Using the “Rest and Walk” Method – Walking for 45 minutes, then resting for 10 kept me from getting too tired.
- Keeping my posture straight – Leaning forward too much strained my back and shoulders.
Why Trekking Poles Were a Game-Changer
I initially thought trekking poles were only for pro hikers, but they became my lifesavers on this trek! They:
- Reduced pressure on my knees, especially during downhill sections.
- Helped me maintain balance on rocky and slippery trails.
- Allowed me to use my arms for support, distributing the effort more evenly.
Using proper walking techniques and trekking poles made the trek less tiring and much safer for me as a beginner.
8. Keeping a Strong Mindset
What Kept Me Going?
I won’t lie—there were moments on the trek when I felt like giving up. The long hours, the thin air, and the aching muscles made me question if I could reach Satopanth Lake. But I quickly realized that trekking is as much a mental challenge as a physical one.
Here’s what helped me stay motivated:
- Breaking the trek into small goals – Instead of thinking about the whole trek, I focused on reaching the next rest stop.
- Reminding myself why I started – The thought of seeing the breathtaking emerald-blue lake kept me going.
- Listening to music and podcasts – They kept my mind engaged during long stretches.
Overcoming Mental Barriers
One of the biggest struggles was self-doubt. Every time I felt too tired, I reminded myself:
- "I've prepared for this—I can do it!"
- "Every tough step brings me closer to the summit."
- "Others have done it, so why can’t I?"
The right mindset and self-talk played a huge role in pushing me forward when my body felt like quitting.
9. Weather Surprises and Staying Prepared
How I Handled Sudden Weather Changes
One thing I learned very quickly was that mountain weather is unpredictable. One moment, the sun was shining; the next, dark clouds rolled in, bringing rain, snow, or icy winds. If I hadn't been prepared, I would have suffered in the cold.
To handle sudden weather changes, I always:
- Wore layered clothing – So I could easily add or remove layers depending on the temperature.
- Carried a rain poncho and backpack cover – These kept me dry when unexpected showers hit.
- Kept extra gloves and socks – Wet hands and feet make trekking miserable, so I always had dry backups.
The Cold Nights at High Altitude
One of the toughest parts was dealing with freezing temperatures at night. My first night camping at high altitude was painfully cold, but I learned to:
- Wear dry thermals before sleeping – Moisture in clothes makes you feel colder.
- Use a sleeping bag liner for extra warmth.
- Keep my water bottle inside my sleeping bag to prevent it from freezing overnight.
By preparing for the worst, I managed to stay warm, dry, and comfortable throughout the trek.
10. Safety and Emergency Preparedness
First-Aid Kit: A Lifesaver
One of the most important things I packed was my first-aid kit. Even though I didn’t have any major injuries, having the right supplies made me feel safe and prepared.
Here’s what I carried:
- Band-aids and antiseptic cream – For small cuts and blisters.
- Painkillers and muscle spray – Helped with sore legs and headaches.
- Diamox tablets – Used to prevent altitude sickness (but only after consulting a doctor).
- ORS (Oral Rehydration Salts) – Helped prevent dehydration after long hours of trekking.
Navigation and Communication
One major challenge on this trek is that there’s no mobile network. If something goes wrong, you can’t just call for help. So, I made sure to:
- Stay with my group and never wander off alone.
- Carry an offline GPS app with pre-downloaded maps.
- Inform my family about my itinerary before leaving so they knew my expected return date.
Being proactive about safety gave me peace of mind and ensured that I could enjoy the trek without unnecessary risks.
Conclusion
Looking back, the Satopanth Lake trek was one of the most demanding yet rewarding experiences of my life. There were moments when my body wanted to quit, but my preparation, smart trekking strategies, and strong mindset helped me reach the stunning glacial lake.
For any beginner planning this trek, my biggest advice is:
- Train well – Strength and endurance make a huge difference.
- Pack smart – Light but essential gear is key.
- Stay mentally strong – Your mindset can push you through the toughest moments.
If you’re thinking about doing this trek, go for it—it’s an adventure you’ll never forget!