Sandakphu Phalut Trek Difficulty Level: Is It the Right Trek for You?
1. Introduction: Why I Chose the Sandakphu Phalut Trek
When I first heard about the Sandakphu Phalut Trek, I was immediately intrigued by its promise of stunning Himalayan views and the unique experience of trekking along the India-Nepal border.
The idea of witnessing Mount Everest, Kanchenjunga, Lhotse, and Makalu from a single trek was too tempting to resist. However, before committing to the journey, I wanted to understand exactly how difficult it was and whether I was fit enough to complete it.
The trek isn’t as extreme as Everest Base Camp or Roopkund, but that doesn’t mean it’s a walk in the park either. Long distances, steep ascents, unpredictable weather, and high-altitude trekking all come into play. So, if you’re wondering whether you should embark on this adventure, let me share everything I learned from my personal experience to help you decide.
2. The Route: Where the Trek Takes You
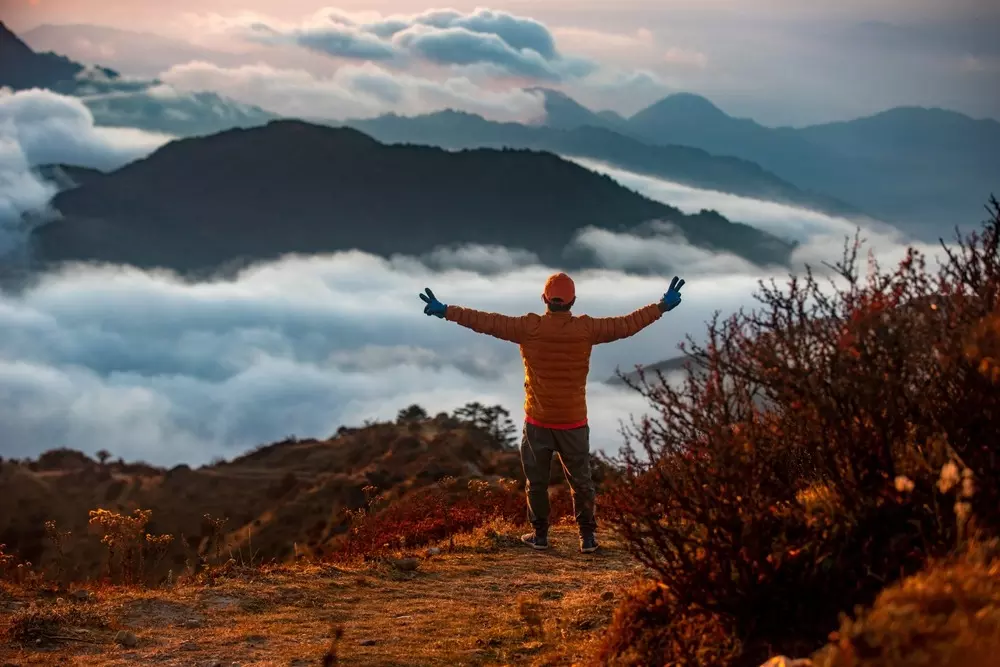
The trek starts from Manebhanjan, a small town in West Bengal, and gradually takes you through lush forests, picturesque villages, and high ridges before reaching Sandakphu (3,636m) and Phalut (3,595m). Along the way, I crossed between India and Nepal multiple times, making the experience even more unique.
Each day of the trek brings something new—from the misty forests of Tumling to the barren, wind-swept ridges near Phalut. One of my favorite moments was reaching Sandakphu at sunrise and watching the golden light slowly unveil the towering peaks in the distance.
It felt like standing on top of the world! If you're planning to embark on the Sandakphu Phalut Trek and want a hassle-free, well-organized experience, I highly recommend booking with The Searching Souls. They offer expert guides, comfortable accommodations, and seamless logistics, ensuring you can focus on enjoying the trek without any worries.
3. The Trek’s Difficulty Level: What to Expect
Before I started, I had read that this was a moderate trek, and I’d say that description is fairly accurate. It doesn’t involve technical climbing, but it does require stamina and endurance. The daily trekking distances are long, and certain stretches—like the climb from Kalapokhri to Sandakphu—can feel relentless.
The hardest part for me was the long descent from Phalut to Gorkhey. After days of continuous walking, my legs were already tired, and descending for hours on rocky terrain really took a toll on my knees. If you’re someone who struggles with knee pain, make sure to bring a pair of trekking poles—they will be your best friends!
4. Physical Fitness: Do You Need to Train?
I won’t sugarcoat it—this trek demands endurance. If you’re someone who doesn’t exercise regularly, I highly recommend doing some pre-trek training at least a month before your trip.
I prepared by doing regular cardio (running and cycling) to improve my lung capacity, along with leg and core strengthening exercises to build endurance. If you can comfortably walk 10-12 km in one go, you’ll be in good shape for this trek. However, if you lead a sedentary lifestyle, this trek could feel significantly harder.
5. Trek Duration: How Many Days Does It Take?
The standard itinerary for the Sandakphu Phalut Trek is 6-7 days, covering a distance of approximately 80 km. Each day, you’ll be trekking for around 5-7 hours, depending on your pace and stamina.
I personally found the pace manageable, but some days—especially the 21 km trek from Sandakphu to Phalut—were quite exhausting. The key is to take it slow, listen to your body, and enjoy the journey rather than rushing to the destination.
6. Terrain: What Kind of Trails Can You Expect?
The trek takes you through diverse terrain, which keeps things interesting but also challenging. Some sections are paved stone paths, while others are muddy, rocky, or covered in loose gravel.
One of the most beautiful yet difficult sections was the trail from Sandakphu to Phalut—it was exposed, windy, and extremely cold. However, the panoramic views along the ridge made every step worth it.
7. Weather Conditions: How They Affect the Trek
I quickly learned that weather can make or break this trek. I trekked in November, which is considered the best season for clear views and stable conditions, but even then, temperatures dropped to freezing levels at night.
If you trek in spring (March-May), you’ll see blooming rhododendrons, while winter (January-February) brings snow-covered trails. However, avoid the monsoon season (June-September) as the trails get slippery, leech-infested, and dangerous.
8. Altitude and Acclimatization: Can You Get Altitude Sickness?
At 3,636m, Sandakphu isn’t extremely high, but altitude sickness is still a risk. I made sure to stay hydrated, eat well, and walk slowly to avoid any problems.
The gradual ascent of the trek helps with acclimatization, but I still felt a mild headache at Sandakphu. If you’re sensitive to high altitudes, consider taking Diamox (altitude sickness medication) as a precaution.
9. Food and Accommodation: What to Expect
One of the best things about this trek is that it’s a tea-house trek, meaning you don’t need to carry tents or food. The lodges are simple but comfortable, serving local meals like rice, lentils, and vegetables.
Don’t expect luxury, though! Many places have basic wooden beds, shared bathrooms, and limited electricity. The food is warm and filling, but if you need snacks, I’d suggest carrying chocolates, nuts, and energy bars.
10. Packing List: What to Bring?
Packing right can make or break your trek. My must-have items were:
✔ Good trekking shoes (A MUST for rocky terrain!)
✔ Thermal layers and a windproof jacket
✔ A rain cover (Weather can change unexpectedly)
✔ Trekking poles (Lifesavers on steep descents)
✔ Sunscreen and sunglasses (The sun at high altitude is harsh)
11. Solo vs. Group Trekking: Which is Better?
I chose to trek with a group, and I highly recommend it for safety, cost-sharing, and motivation. Solo trekking is possible but requires self-sufficiency, strong navigation skills, and extra costs for hiring a personal guide.
If it’s your first high-altitude trek, I’d say go with a guided group for a smoother experience.
12. Cost and Budget: How Much Does It Cost?
Trekking to Sandakphu is relatively budget-friendly, costing around ₹10,000-₹15,000 per person (including guides, accommodation, and permits). If you hire a porter or prefer a private vehicle, costs will be higher.
My tip? Travel in a group to split guide and accommodation costs. It makes a big difference!
13. Who Should and Shouldn’t Attempt This Trek?
If you love long hikes, mountain views, and cultural experiences, this trek is for you. However, if you have knee problems, altitude sickness issues, or dislike basic accommodation, this might not be the best choice.
14. Tips for a Successful Trek
✔ Train in advance for stamina
✔ Start early each day to reach your destination before dark
✔ Dress in layers to adjust to changing temperatures
✔ Respect local culture and minimize waste
15. Final Thoughts: Is This Trek Right for You?
This trek challenged me physically but rewarded me with unforgettable views and experiences. If you’re up for an adventure that tests your endurance while immersing you in nature, I say GO FOR IT!