How to Plan a Hassle-Free Hampta Pass Trek with a Tour Guide
Introduction to the Hampta Pass Trek
Why Hampta Pass is a Must-Do Trek
When I first stumbled upon photos of Hampta Pass, I knew I had to go. The idea of walking from the lush green Kullu Valley into the barren, almost lunar landscape of Spiti just sounded unreal. And let me tell you—nothing prepares you for the surreal beauty that unfolds with every step. It’s like walking into a real-life travel documentary.
For someone like me, who’s not a professional mountaineer but absolutely loves nature, this trek felt just right. It’s adventurous without being extreme. We trekked to an altitude of about 14,100 feet, and while that’s pretty high, it’s doable with the right guidance and a bit of preparation.
What really sold me, though, was the contrast. Imagine trekking through flower-covered meadows in the morning and reaching snow-covered passes by afternoon. The drama of nature is on full display here, and every day feels like a completely different trek.
And if you're anything like me—someone who’s excited but a little anxious about planning everything—then trust me, going with a tour guide was the best decision I made. I didn’t have to worry about permits, food, safety, or even setting up the tents. All I had to do was enjoy every moment.
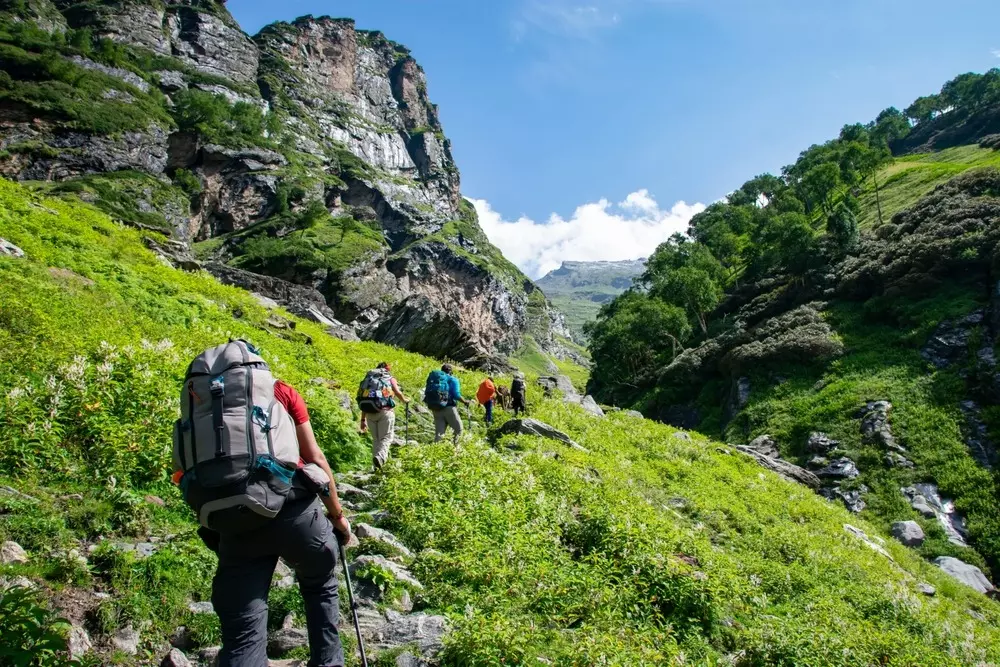
Location and Overview of the Route
Hampta Pass is tucked away in the Pir Panjal range of the Himalayas in Himachal Pradesh, India. The trek starts from Jobra, which is a short drive from Manali—a town that’s become one of my favorite mountain getaways.
The trail winds through Chika, Balu ka Ghera, and Shea Goru, before ending at Chatru in Spiti. If you're lucky with weather and road conditions, you can even make a detour to the stunning Chandratal Lake.
The total trail is about 25 to 30 kilometers long and is usually covered in 4 to 5 days. That might sound short, but every single kilometer is packed with adventure—rivers to cross, glaciers to walk on, and skies that change colors with every passing hour.
Best Time to Trek Hampta Pass
Seasonal Highlights
Before I booked my trek, I did a ton of research on the best time to go. What I found—and later experienced—is that each month from mid-June to September offers something special.
- June and early July: We still saw snow on the higher stretches. If you're someone who dreams of snow trekking, this is your window. It was cold, yes, but completely magical. The white patches made the entire trail look like a fantasy novel.
- August: While this is monsoon in many parts of India, the Hampta Pass trail stays relatively protected after a certain point. I met trekkers who went in August and loved the blooming wildflowers and green meadows.
- September: I personally think this is the golden period. Clear skies, fewer crowds, and a perfect balance between green and white landscapes. If you want the best photos and smooth trekking conditions, aim for September.
Weather Conditions to Expect
Let’s talk about the weather—because honestly, the Himalayas don’t mess around. During the day, it was pretty pleasant. I’d say around 12°C to 18°C depending on the altitude. But at night, especially at camps like Balu ka Ghera and Shea Goru, the temperature dipped below zero. I’m talking frost-on-the-sleeping-bag kind of cold.
One of the biggest perks of having a tour guide? They knew exactly how to prep us each day. Whether it was layering tips or choosing the right time to cross a river before it swelled, their experience made all the difference.
When weather turned suddenly windy near the pass, our guide made the call to delay the climb by an hour—and that call possibly saved us from a miserable, risky hike.
Choosing the Right Tour Guide or Trekking Company
Key Qualities to Look for in a Guide
Okay, so here’s the thing: going solo might sound adventurous, but in the Himalayas, it’s not worth the risk—especially if you’re a first-timer. My guide, Sonu bhaiya, was a local with over 20 treks under his belt.
That man could sense weather changes like a human barometer. He also knew which water streams were safe to drink from, which shortcuts were risky, and even how to cook up a hot meal when the wind was howling outside the tent.
When you're picking a guide or company, make sure they’re:
- Certified and experienced – Not just someone who’s done the trek once or twice.
- Familiar with the area – Locals are usually your best bet.
- Carrying essential safety gear – Oxygen cylinders, walkie-talkies, and a medical kit are non-negotiable.
- Good communicators – Trust me, when you’re exhausted and struggling to climb, a few motivating words in your own language go a long way.
Comparing Tour Packages and Reviews
I spent a few evenings scrolling through websites, comparing prices and itineraries. Some packages were cheap, but they lacked proper safety measures. Others were over-the-top luxurious and didn't really suit the adventure vibe I was going for.
Eventually, I booked through a mid-range local company with glowing reviews and reasonable pricing. Their all-inclusive package covered food, accommodation, transport, permits, and gear. No surprise costs, and the service was A1.
Here’s a tip: don’t just rely on their website. Go stalk their Instagram, read Google reviews, and check if past trekkers have shared stories or vlogs. Those firsthand insights helped me make a confident decision.
Planning Your Itinerary
Ideal Duration of the Trek
While the trek is usually spread over 4 to 5 days, I added a buffer day for safety, and I highly recommend it. Mountains are unpredictable, and having that one extra day gives you some breathing room in case of bad weather or altitude issues.
Here’s how my trek played out:
- Day 1 – Drive from Manali to Jobra, then trek to Chika. It was a warm-up day, and the excitement was real.
- Day 2 – Chika to Balu ka Ghera. The terrain started getting more serious, but the views kept us going.
- Day 3 – Balu ka Ghera to Shea Goru via Hampta Pass. This was the toughest and most beautiful day. We were literally walking above clouds.
- Day 4 – Shea Goru to Chatru. If roads were open, we’d have visited Chandratal, but we skipped due to landslides.
- Day 5 – Return to Manali. Legs were sore, but hearts were full.
Detailed Day-by-Day Itinerary
Each day had its own vibe. Day 1 felt like a forest adventure, with chirping birds and soft trails. Day 2 was all about climbing steadily and getting used to thinner air. Day 3, oh man, that day pushed every physical limit I had—but it was also the most rewarding. Standing at the pass, I felt like I’d earned a badge of honor.
Day 4 was easier, and descending into Spiti’s barren beauty gave me serious Martian vibes. And finally, the return journey was bittersweet. I didn’t want it to end, but I also craved a hot shower and a soft bed!
Permits and Documentation
Required Permits and How to Obtain Them
One of the perks of booking with a reputable guide? They sorted out all the permits for me. I only had to provide:
- A government ID copy
- A couple of passport-size photos
The main permits were from the forest department and a camping fee. These were arranged either in Manali or at the base village. I didn’t have to stand in line or worry about the paperwork—it was all taken care of before we started the trek.
Travel Insurance and Medical Certificates
I opted for travel insurance that covered high-altitude trekking. It wasn’t expensive, and it gave me peace of mind. While it wasn’t compulsory, my trekking company strongly recommended it.
I also got a basic fitness certificate from my local doctor before the trip. It was a small step, but it helped the guide understand my health history, just in case anything went wrong on the trail.
What to Pack for the Hampta Pass Trek
Clothing Essentials
Let’s be real: packing for a Himalayan trek is a balancing act. Pack too little and you freeze; pack too much and your backpack becomes a nightmare. I learned this the hard way. But after doing Hampta Pass, I figured out exactly what works.
Here’s what I packed—and what I wish I packed:
- Base Layers: Thermals are a lifesaver, especially at night. I wore a full-sleeve thermal top and bottom every night while camping.
- Insulation: My down jacket was my best friend. It’s warm, lightweight, and compresses easily. I also carried a fleece jacket for layering during the day.
- Outer Layer: A waterproof windcheater or rain jacket is essential. I got caught in a surprise drizzle near Balu ka Ghera, and my rain jacket saved my gear and mood.
- Trekking Pants: I carried two pairs—one quick-dry and one fleece-lined for colder days. Jeans? Big no.
- T-Shirts: Four quick-dry tees were more than enough. I rotated them and dried them in the sun whenever I could.
- Woolen Cap, Gloves & Buff: These were non-negotiable. The wind near Hampta Pass can numb your fingers in minutes.
My guide actually gave a short briefing on Day 0 in Manali, listing everything we’d need. It was super helpful because you don’t want to be up at 14,000 feet realizing you forgot gloves!
Trekking Gear Checklist
Besides clothes, there’s gear—and this stuff makes or breaks your comfort.
Here’s what I carried:
- Backpack (40–50L): Big enough to carry essentials but compact enough for comfort. A rain cover is a must.
- Trekking Poles: I was skeptical, but using poles helped me conserve energy and reduce strain on my knees.
- Sleeping Bag: Provided by the trek company, but I always bring a liner for hygiene.
- Headlamp: Way better than a flashlight because it keeps your hands free.
- Reusable Water Bottle & Thermos: Staying hydrated is key, and having warm water is a blessing.
- Power Bank: You won’t find charging points after Day 1. I kept my phone on airplane mode to save juice.
- Sunscreen, Lip Balm & Moisturizer: High-altitude sun burns fast, and the air gets painfully dry.
Pro tip? Keep a small zip-lock bag for waste—candy wrappers, tissues, etc. It feels good to trek responsibly.
Physical Preparation and Fitness Tips
Training Schedule
If you think you can wake up and just hike Hampta Pass without prepping your body—well, think again. I’m not an athlete by any means, but I started a basic training schedule about 4–6 weeks before the trek.
Here’s what worked for me:
- Walking/Jogging: I started walking for 45 minutes daily and gradually increased it to light jogging. It helped me build stamina.
- Stair Climbing: This was a game changer. I’d climb 5–6 flights of stairs with a backpack to simulate uphill walking.
- Bodyweight Exercises: Squats, lunges, and planks helped build core strength and leg endurance.
- Breathing Exercises: Pranayama and deep breathing really helped me adjust to high altitudes better. It sounds simple, but it’s super effective.
By the time I reached Balu ka Ghera, I was out of breath—but not out of energy. That training made all the difference.
Altitude Sickness Awareness
I was honestly nervous about AMS (Acute Mountain Sickness). I’d read horror stories about it. Thankfully, our guide briefed us in detail and kept checking in regularly.
Here are a few golden rules I followed:
- Hydration: I drank at least 3 liters of water daily. Even when I wasn’t thirsty.
- No Alcohol: Avoided it entirely before and during the trek.
- Slow and Steady: I didn’t try to be a hero and outpace others. I walked slowly, giving my body time to adjust.
- Recognizing Symptoms: Headache, nausea, dizziness, or breathlessness are signs. I was lucky, but a couple of trekkers felt uneasy near the pass. Our guide gave them extra rest and monitored them closely.
If you’re trekking with a guide, they’ll be trained in spotting AMS early. That peace of mind is priceless.
Safety Tips for a Hassle-Free Trek
How Guides Help Ensure Your Safety
One of the main reasons I opted for a guided trek was safety. And trust me, I’m so glad I did. From reading the weather to handling emergencies, our guide and his team were on it.
Here’s what made me feel secure:
- Daily Briefings: Every night, our guide would gather us and talk about the next day—terrain, weather, water availability, and what to wear. That clarity helped me prepare mentally and physically.
- Emergency Protocols: They carried a first-aid kit, oxygen cylinder, and even a walkie-talkie for signal dead zones. When one of the trekkers developed a sprain, they quickly wrapped it and adjusted the pace for her.
- River Crossings: Some rivers were thigh-deep and fast. Our guide would literally hold our hands and guide us across. No way I’d have done that solo.
It’s easy to underestimate the wild, but the Himalayas demand respect. Having a guide was like having a safety net throughout.
Emergency Contacts and Communication Tools
Most of the Hampta Pass trail is a signal blackout zone. So don’t expect to upload Insta stories live from the pass. Instead, prepare:
- Tell Someone: I shared my itinerary and guide’s contact with my family before heading out.
- Offline Maps: I downloaded the trail map on Maps.me just in case.
- Walkie-Talkies: The guide team used these to stay in touch when spread out.
A little planning goes a long way in keeping things smooth.
Accommodation and Food Along the Trek
Campsites and Lodging Options
If you’ve never camped in the Himalayas, you’re in for a treat. Sleeping under a million stars with a chilly breeze brushing your face? Nothing compares. Every night, we camped at beautiful spots—by rivers, in open meadows, or at the base of a mountain.
Here’s how the accommodation was set up:
- Tents: Shared tents (2–3 people) were clean, waterproof, and windproof. Sleeping bags were thick and toasty.
- Toilet Tents: They had a portable dry toilet system. Not glamorous, but definitely manageable.
- Kitchen Tent: This is where the magic happened. Our cook whipped up meals that tasted like home—even at 12,000 feet!
One night, they even served hot pakoras and chai as we reached camp in the rain. I nearly cried with joy.
Meal Plans and Dietary Needs
Food was surprisingly awesome. I expected instant noodles and soup packets, but we got:
- Breakfast: Parathas, upma, poha, and tea
- Lunch: Packed rotis with sabzi, or rice with dal
- Snacks: Biscuits, juice, and even Maggi at the top of the pass
- Dinner: Hot rice, dal, sabzi, and sometimes a sweet like kheer or halwa
They also asked about allergies or food preferences before the trek. There were vegetarians and even one gluten-intolerant trekker in our group—and everyone was taken care of.
I carried a few protein bars and dry fruits for emergencies, but I barely needed them.
Budgeting Your Hampta Pass Adventure
Cost Breakdown of Guided Tours
Here’s a rough cost breakdown based on my 5-day trek package:
ExpenseCost (INR)Trek Package₹8,000 – ₹12,000Transport (to/from Manali)₹1,500 – ₹2,000Rentals (jacket, poles)₹1,000 approxPersonal Expenses₹1,000 maxTotal₹11,500 – ₹16,000Honestly, for the experience and comfort, it’s 100% worth it.
Hidden Costs and Money-Saving Tips
While most things were covered, a few extra costs popped up:
- Tips for the guide and cook (I gave ₹500—it was well deserved)
- Extra snacks or water bottles on the way to Jobra
- Hotel stay in Manali (pre/post-trek)
To save money:
- Bring your own gear if possible
- Share transport with fellow trekkers
- Book early—some companies offer discounts
Group vs Solo Guided Trek
Pros and Cons of Group Treks
When I first thought about Hampta Pass, I debated whether to go solo or join a group. I eventually chose a group guided trek, and looking back—it was one of the best parts of the journey.
I made friends from across the country, shared stories by the campfire, and we all cheered each other up during the tough climbs.
Here’s what I loved about going with a group:
- Shared Energy: The positivity of the group kept me going. When someone cracked a joke or cheered others on during the steep climb to the pass, it felt like a mini-family out there.
- Built-in Safety Net: With more people, there’s always someone to help if you stumble, feel sick, or need moral support.
- Fun Evenings: Evenings at the campsite were filled with singing, storytelling, and card games. Solo would’ve been quiet—and maybe a bit lonely.
That said, there were a few downsides:
- Pace Variations: Some folks were faster, others slower. I found myself adjusting quite a bit.
- Less Flexibility: The group moves together, so there’s limited freedom to customize your pace or stop for long photography breaks.
But for a first Himalayan trek, I’d recommend going with a group—it made the whole experience more vibrant and a lot less intimidating.
Private Guided Experience
If you prefer solitude or want to go at your own pace, a private guided trek is a great option—just be ready to spend more. I met a couple on the trail who had booked a custom itinerary, and they had a guide, cook, and porter just for themselves. They seemed to really enjoy the flexibility.
Here’s when a private trek makes sense:
- You’re trekking with your partner or a small group of friends
- You’re into photography and want to take your time
- You prefer a slower or faster pace than most groups
- You value privacy and personalized service
I’m thinking of going private next time, maybe for a longer trek like Pin Parvati or Rupin Pass. “I personally went with The Searching Souls for my Hampta Pass trek, and they took care of everything—permits, gear, safety, even the little comforts. Couldn’t have asked for a better experience!
Local Culture and Responsible Tourism
Interacting Respectfully with Locals
One of the most enriching parts of the Hampta Pass trek was the brief but beautiful interactions with locals. From the drivers who took us to Jobra, to the shepherds guiding their flocks along the trail—every encounter added depth to the journey.
Here’s what I learned:
- Smile and Greet: A simple “Namaste” or nod goes a long way. The locals are kind, and many enjoy a brief chat.
- Ask Before Clicking Photos: I asked a shepherd if I could photograph his dog (who looked like a mountain lion!), and he smiled and nodded. It’s a small act of respect.
- Buy Local: I grabbed a handmade wool cap from a woman in Manali—it’s my favorite souvenir now.
These communities are the true guardians of these trails, and treating them with respect felt like the least I could do.
Leave No Trace Principles
Trekking responsibly became personal for me. On Day 2, I saw plastic wrappers buried in a bush near the campsite. That sight hit me hard. Since then, I’ve followed and advocated the Leave No Trace philosophy:
- Carry All Waste: I kept a small zip pouch just for trash. Every wrapper, used tissue, and snack packet went in.
- No Soap in Streams: Even biodegradable soap harms the ecosystem. Our guides had a designated water barrel for washing hands.
- Stick to the Trail: Venturing off-path may damage fragile ecosystems or disturb local wildlife.
The mountains give us so much—the least we can do is leave them better than we found them.
Must-Have Apps and Tools for Trekkers
Navigation and Tracking
While I wasn’t glued to my phone on the trail (no signal anyway), I did use a few apps that came in handy before and after the trek.
- Maps.me: I downloaded the Hampta Pass trail offline, and it helped me stay aware of where we were each day.
- Gaia GPS: A solid option for serious hikers. You can download maps and track your movement.
- Trek The Himalayas App: Some companies have their own apps with detailed itineraries and updates. Worth checking if you’re booking through one.
Even with a guide, it was fun to see the progress and understand the terrain better.
Offline Communication Tools
Since we had zero mobile signal beyond Jobra, here’s how we stayed connected:
- Walkie-Talkies: The guide team used these to coordinate with the kitchen and support staff.
- Offline Notes: I saved emergency numbers and important information on my phone in airplane mode.
Also, I used a simple journal app to jot down my daily experiences. It helped me relive the entire journey when I got back home—and it’s how I remember all these little details I’m sharing now!
Post-Trek Relaxation and Nearby Attractions
Exploring Manali and Beyond
Once we returned to Manali, I stayed an extra two days—and honestly, I recommend it to everyone. Your legs will thank you, and your heart will want to soak in a little more mountain magic before heading back to city life.
Here’s how I relaxed post-trek:
- Old Manali: The cafes, the live music, the chilled-out vibe—it’s heaven after five days in the wild. I had the most epic chocolate pancake and cappuccino at a riverside café.
- Hidimba Temple: Nestled in the deodar forest, it’s peaceful and historic.
- Manu Temple & Local Markets: Perfect for souvenirs like wool shawls, hand-knitted socks, and Himalayan salt lamps.
Hot Springs, Cafes, and Local Markets
If your body’s sore (and it probably will be), nothing beats a soak in the Vashisht hot springs. The water is naturally warm, and the view of the mountains while you relax in the pool? Pure bliss.
I also explored local bakeries—try German Bakery in Old Manali—and found handmade trinkets and crystals in the street stalls. One local seller even gave me tea while I browsed. These moments felt like a warm hug from the mountains before I said goodbye.
Conclusion and Final Thoughts
Planning my Hampta Pass trek with a tour guide turned out to be more than just a smart decision—it was the reason my experience was smooth, safe, and incredibly fulfilling.
From logistics to safety, from the beauty of nature to the power of group energy, every part of the journey was elevated because I didn’t have to worry about a thing. I could just be in the moment.
If you’ve been on the fence about it, let me be the one to tell you: go for it. Prepare well, choose the right guide, pack smart, and you’ll come back a little more alive, a lot more grateful, and endlessly inspired.
FAQs
1. Is the Hampta Pass trek suitable for beginners?
Yes, it’s one of the best Himalayan treks for beginners. With moderate difficulty and stunning views, it’s perfect if you're decently fit and go with a guide.
2. How cold does it get at Hampta Pass?
At the highest camp (Shea Goru), it can drop below 0°C at night. During the day, expect 12–18°C in lower camps and colder as you ascend.
3. What if I feel unwell during the trek?
Most guides are trained to handle altitude sickness and minor injuries. Let them know immediately if you feel dizzy, nauseous, or breathless. Rest, hydrate, and don’t push through.
4. Can I rent trekking gear instead of buying?
Absolutely. In Manali, you can rent jackets, trekking poles, shoes, and even backpacks. It’s affordable and convenient.
5. Are mobile networks available on the trail?
Nope. Once you leave Jobra, there’s pretty much zero signal until you return to Manali. Download maps, save contacts, and enjoy the digital detox.