How to Make the Kedartal Trek Easier for Beginners?
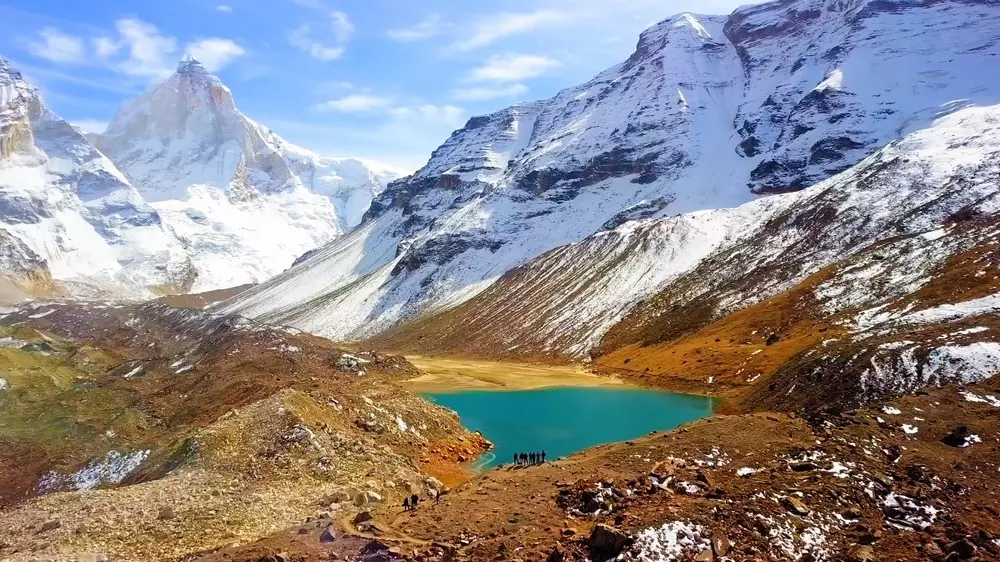
The Kedartal Trek is an adventure that takes you deep into the Himalayas, offering breathtaking views of Thalay Sagar, Bhrigupanth, and other majestic peaks. However, for beginners, this trek can be physically and mentally demanding. I remember feeling overwhelmed before starting my journey, but with careful preparation, I was able to complete it successfully.
Whether it’s choosing the right time, training properly, or carrying essential gear, every detail matters.
In this guide, I’ll break down the most effective ways to make the Kedartal Trek easier for beginners. With the right approach, this challenging trek can turn into an unforgettable experience rather than a struggle. Let’s dive in!
1. Best Time to Do the Kedartal Trek
The timing of your trek plays a crucial role in determining how difficult or smooth your experience will be. The best seasons to trek to Kedartal are May to June and September to October. During these months, the weather is relatively stable, and the trails are clear, making the journey more manageable.
In May and June, the snow begins to melt, revealing a well-defined path, while September and October offer crystal-clear skies and mesmerizing views of the surrounding peaks. The temperature during these periods ranges from 10°C during the day to -5°C at night, making it cold but not unbearably harsh.
If you’re a beginner, I strongly recommend avoiding the monsoon season (July-August) due to heavy rainfall, which makes the trails slippery and increases the risk of landslides. Similarly, November to April brings extreme cold, heavy snowfall, and closed trails. Winter trekking is only for highly experienced mountaineers. Choosing the right season ensures not only safety but also a more enjoyable and successful trek.
2. Physical Preparation Before the Trek
The Kedartal Trek requires a good level of fitness, and without proper preparation, even the most scenic trails can become exhausting. Before my trek, I dedicated 6-8 weeks to training, focusing on cardio, strength, and flexibility exercises. Running, cycling, and stair climbing helped me build stamina, while squats and lunges strengthened my legs for the steep ascents. A strong core is also essential for balance, so I included planks and core exercises in my routine.
Breathing techniques also played a vital role in my training. High altitudes mean less oxygen, so I practiced deep breathing and pranayama to improve my lung capacity. If possible, I recommend training at high-altitude locations before the trek to help your body adjust. The more prepared you are, the more enjoyable the trek will be. Physical training is not just about endurance; it also prevents injuries and reduces fatigue, making your trekking experience much smoother.
3. Mental Preparation for the Trek
Trekking presents both mental and physical challenges. There were moments when exhaustion made me question whether I could continue, but having the right mindset kept me going. Before my trek, I spent time visualizing my success—imagining myself standing beside the serene Kedartal Lake, feeling the cold mountain air, and witnessing the beauty of the Himalayas. This positive reinforcement gave me confidence.
Another helpful mental strategy was breaking the trek into smaller milestones. Instead of worrying about the entire journey, I focused on reaching the next checkpoint. This made the trek feel more achievable and less intimidating. I also reminded myself that discomfort was temporary and that pushing through the tough moments would be worth it in the end. A strong mindset can make all the difference when trekking in the Himalayas.
4. Choosing the Right Gear for the Trek
Packing the right gear can make your trek much easier and more comfortable. The most important piece of equipment is a good pair of trekking shoes. I invested in waterproof, high-ankle trekking boots with a strong grip, which saved me from slipping on rocky and icy patches. Along with sturdy shoes, I packed thermal base layers, fleece jackets, and a waterproof outer layer to stay warm and dry.
A well-packed backpack (40-50L) made carrying essentials easier. I included trekking poles, which significantly reduced strain on my knees, especially on steep climbs. A headlamp, extra batteries, gloves, a hat, and sunglasses were also essential. I packed snacks like dry fruits and energy bars to maintain my energy levels and carried a hydration pack to ensure I drank enough water. Investing in quality gear made my trek more comfortable and reduced unnecessary stress.
5. Acclimatization and High-Altitude Sickness Prevention
High-altitude trekking brings the risk of Acute Mountain Sickness (AMS), which can cause headaches, nausea, and dizziness. I took precautions to acclimatize properly by ascending gradually and allowing my body time to adjust to the lower oxygen levels. Staying hydrated was crucial—I drank at least 4 liters of water daily and avoided alcohol and caffeine, which can worsen dehydration.
I also followed the “climb high, sleep low” rule, where I would hike to higher altitudes during the day but descend slightly to sleep at a lower altitude. Carrying Diamox (altitude sickness medication) helped as a preventive measure, though I only took it after consulting with a doctor. Understanding altitude sickness and taking the right precautions ensured a safer and more enjoyable trek.
6. Managing Trekking Pace and Breaks
One of the biggest mistakes beginners make is trekking too fast. I learned that pacing myself was the key to conserving energy. I walked at a slow and steady pace, ensuring I didn’t tire myself out early in the day. Taking short breaks every hour helped my body recover while keeping my muscles warm.
Instead of sitting down for long breaks, I would rest while standing or leaning against a rock. This prevented my muscles from stiffening up. Keeping a consistent rhythm with my steps and breathing also helped me maintain a comfortable trekking pace. By managing my pace wisely, I was able to enjoy the trek without feeling exhausted too soon.
7. Hiring a Guide or Joining a Group
As a beginner, trekking with an experienced guide and group made a huge difference. My guide ensured that I followed the safest route and helped me navigate difficult sections. Trekking in a group provided motivation and companionship, which was incredibly encouraging during tough stretches.
A good trekking group also means sharing responsibilities—carrying food, supplies, and first aid among team members rather than bearing the entire load alone. If you’re new to trekking, I highly recommend joining a guided trek rather than attempting it solo. It enhances safety, learning, and overall enjoyment. Want to make your Kedartal Trek easier and more enjoyable? Join The Searching Souls for a well-organized trekking experience with expert guides who ensure your safety, comfort, and a truly unforgettable adventure.
8. Eating the Right Food During the Trek
Maintaining good nutrition is essential for sustained energy. I focused on carbohydrates and proteins, eating meals like dal, rice, and roti for sustained energy. I carried nuts, energy bars, and chocolates to snack on during the trek, providing quick bursts of energy when needed.
Eating too much heavy food made trekking uncomfortable, so I kept my meals light and hydrating. Drinking soups, herbal tea, and warm water helped keep my body temperature stable. A well-balanced diet ensured I remained strong and energized throughout the trek.
9. Staying Safe on the Trek
Safety is the number one priority when trekking in the mountains. Before starting the trek, I made sure to check the weather forecast and avoid trekking during unpredictable weather conditions. Sudden snowfall or rain can make the trails slippery and dangerous, so knowing the forecast helped me prepare accordingly. Another crucial step was carrying a first aid kit with altitude sickness medication, bandages, antiseptic creams, and pain relievers. Even small injuries like blisters can become a big problem if not treated properly.
Additionally, I always stayed aware of my surroundings. Trekking in the Himalayas means facing possible risks like loose rocks, sudden weather changes, and narrow paths. Walking carefully, following the guide’s instructions, and avoiding unnecessary risks made my journey safer. I also made sure to inform someone about my trekking schedule, so in case of an emergency, people knew my whereabouts. Taking safety seriously ensured that I completed my trek without any major difficulties.
10. Practicing Responsible Trekking
The beauty of Kedartal is untouched, and I wanted to make sure I left no trace behind. Practicing responsible trekking means respecting the environment and preserving the natural beauty for future trekkers. I carried a trash bag to collect my waste and ensured I didn’t litter along the way. Plastic pollution is becoming a serious issue in many trekking areas, and I didn’t want to contribute to it.
I also followed the Leave No Trace principle by avoiding loud noises and respecting wildlife. The Himalayas are home to many animals, and disturbing their habitat is not only unethical but also dangerous. Additionally, I made sure to respect the local culture and traditions. Being polite to locals, understanding their customs, and following their guidelines made my experience even more enriching. Trekking responsibly is not just about enjoying nature—it’s about ensuring that others can enjoy it in the future too.
11. Dealing with Weather Changes
Weather in the Himalayas can be highly unpredictable. One moment the sun is shining, and the next, you’re caught in freezing winds. To prepare for sudden changes, I packed layered clothing. This allowed me to adjust to temperature shifts without feeling too hot or too cold. My layering system included a moisture-wicking base layer, an insulating fleece jacket, and a waterproof outer layer to keep me dry.
Carrying a rain cover for my backpack and waterproof gloves ensured that my essentials didn’t get wet. The temperature at night can drop significantly, so having thermal innerwear and a good quality sleeping bag was necessary. I also learned to listen to local guides who could predict weather changes better than any app. By preparing for all kinds of weather, I was able to enjoy my trek without unnecessary stress.
12. Tips for Better Sleep During the Trek
Sleeping at high altitudes can be tough, especially for beginners. The first night at a higher elevation can leave you tossing and turning, making you feel exhausted the next day. One thing that helped me was using a warm sleeping bag rated for sub-zero temperatures. Investing in a high-quality sleeping bag ensured that I stayed warm even in freezing conditions.
Another helpful trick was keeping my feet warm.
Cold feet can make sleeping very uncomfortable, so I wore an extra pair of woolen socks and even placed a hot water bottle inside my sleeping bag. Avoiding caffeine and heavy meals before bedtime also improved my sleep. Instead, I drank herbal tea or warm water to relax my body. Good sleep is crucial for energy recovery, and these simple tips made my nights much more comfortable.
13. Post-Trek Recovery and Care
After completing the Kedartal Trek, my body felt sore, but proper recovery helped me bounce back quickly. The first thing I did was stretching and light yoga to ease muscle tension. Simple stretches like touching my toes, side bends, and deep breathing exercises helped relax my body. Staying hydrated and eating nutritious food was also essential for muscle recovery. I focused on protein-rich meals like lentils, eggs, and dairy products to rebuild muscle strength.
Resting for a few days after the trek allowed my body to heal. I also made sure to take short walks instead of completely stopping physical activity. Keeping my body moving in a light way helped prevent stiffness and improved my overall recovery. Taking care of yourself post-trek is just as important as preparing for it. Proper recovery ensures that you can enjoy future treks without long-term discomfort.
14. Final Words and Encouragement for Beginners
The Kedartal Trek was one of the most rewarding experiences of my life. Yes, it was tough, but with preparation and determination, I made it. If you’re a beginner, don’t let fear stop you—take it one step at a time, and enjoy the adventure. The sense of accomplishment at the end of the journey is something that stays with you forever.
I encourage every beginner to take the trek at their own pace and enjoy the process. The breathtaking views, the fresh mountain air, and the experience of pushing yourself beyond your limits make it all worth it. No trek is easy, but with the right mindset, training, and preparation, you can make the Kedartal Trek an unforgettable adventure.
FAQs
1. Is the Kedartal Trek suitable for beginners?
Yes, but proper preparation is essential. Training and acclimatization are key. Beginners should start with easier treks before attempting Kedartal.
2. How many days does the trek take?
The trek takes 5-6 days, depending on your pace. It’s important to allow enough time for acclimatization.
3. What permits do I need?
You’ll need a trekking permit from the Forest Department in Gangotri. Permits can be obtained at the starting point of the trek.
4. Can I do the trek solo?
It’s possible but not recommended for beginners. Hiring a guide or joining a group is safer and more enjoyable.
5. What is the most difficult part of the trek?
The steep climb to Kedartal is the toughest, but with proper pacing and preparation, it’s manageable.