Explore 3D Needlepoint for Unique and Creative Projects
Needlepoint has always held a special place in the world of textile arts. Known for its structured stitching and timeless appeal, it has evolved far beyond traditional flat designs.
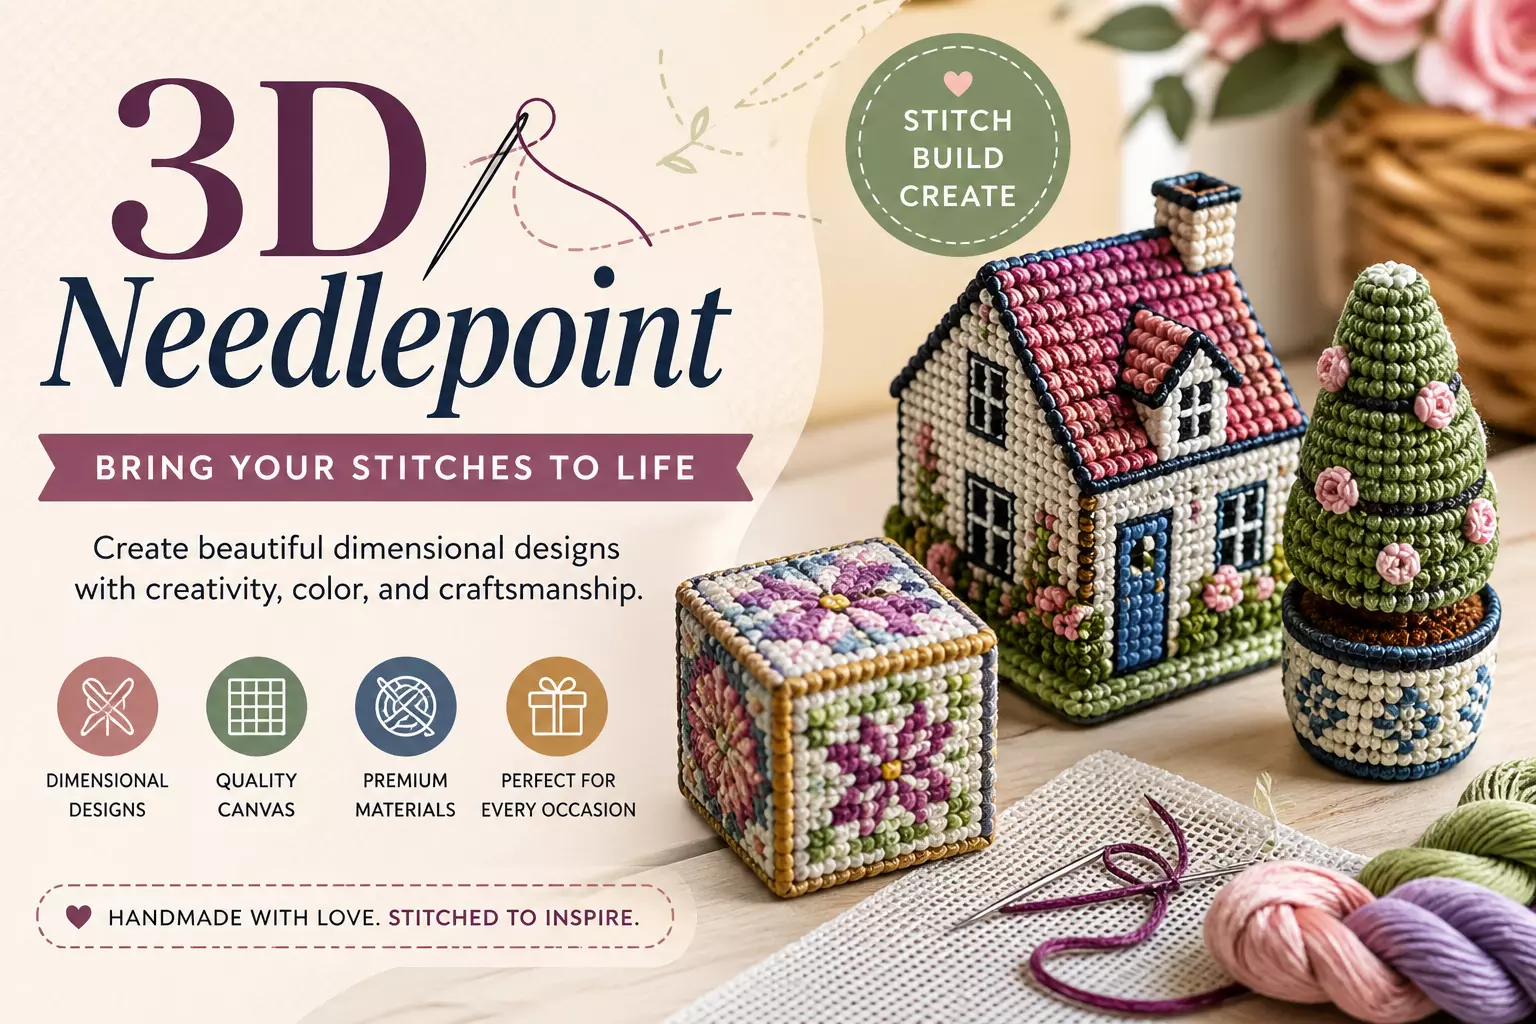
One of the most exciting developments in recent years is 3d needlepoint, a technique that transforms stitched canvases into dimensional, sculptural pieces.
This modern approach blends craftsmanship with creativity, allowing stitches to create objects that are not only decorative but also functional. From ornaments to intricate display pieces, 3D designs are redefining what needlepoint can achieve.
What Makes 3D Needlepoint Unique
Traditional needlepoint involves stitching yarn through a stiff, open-weave canvas to create a flat design. In contrast, 3D work introduces structure. Multiple stitched panels are assembled to form shapes, giving depth and physical presence to the final piece.
This added dimension opens up new creative opportunities. Instead of limiting your work to wall hangings or cushions, you can craft items like:
- Decorative boxes
- Holiday ornaments
- Miniature houses
- Accessories and keepsakes
The ability to turn thread and canvas into something tangible is what draws many modern crafters to this technique.
Understanding the Foundation: Canvas Matters
Every successful needlepoint project begins with the right foundation. While hand-painted canvases are popular, many experienced stitches prefer starting with a Blank needlepoint canvas when working on dimensional designs.
A blank canvas provides complete creative control. Without a printed guide, you can plan your layout, adjust proportions, and experiment freely. This flexibility is especially useful when constructing pieces that require multiple panels or precise alignment.
It also allows you to:
- Customize shapes and sizes
- Practice stitch techniques
- Test new ideas before final assembly
For anyone serious about developing their skills, working on a blank base can be a valuable step toward mastering more complex designs.
Techniques That Bring Dimension to Life
Creating depth in needlepoint isn’t just about assembling pieces—it also involves thoughtful stitching techniques. Some of the most commonly used methods include:
Layering
By stacking stitched sections or using overlapping patterns, you can create a sense of depth within the design itself.
Padding
Adding material beneath certain areas raises the surface, making specific elements stand out.
Structured Stitching
Using strong, consistent stitches helps maintain shape and durability, which is essential for three-dimensional projects.
Assembly and Finishing
Once individual panels are stitched, they are carefully joined together. Clean edges and precise stitching ensure the final piece looks polished and holds its form.
Choosing the Right Materials
The quality of your materials plays a major role in the outcome of your project. Strong canvas, durable threads, and reliable tools all contribute to a better stitching experience.
Common materials include:
- Cotton or wool threads for texture
- Tapestry needles for smooth stitching
- Frames or hoops to maintain tension
- Measuring tools for accurate panel sizing
Many stitches also incorporate decorative elements such as beads or metallic threads to enhance the final look.
Getting Started with 3D Designs
If you’re new to dimensional needlepoint, it’s best to begin with simple shapes. Small projects help you understand how stitched pieces come together and how structure is maintained.
Beginner-friendly ideas include:
- Cubes or small boxes
- Simple ornaments
- Flat-to-3D foldable designs
These projects build confidence and teach essential skills like alignment and finishing.
As you gain experience, you can move on to more detailed work that involves multiple components and intricate construction.
Building Expertise Over Time
Like any craft, mastering needlepoint takes patience and practice. What sets experienced stitches apart is not just skill, but also their understanding of materials and techniques.
To improve your results:
- Keep your stitch tension consistent
- Plan your design before starting
- Take time with finishing and assembly
- Learn from each project you complete
Over time, these small improvements lead to more refined and professional-looking pieces.
The Role of Trusted Craft Sources
Having access to high-quality materials and thoughtfully designed patterns can make a significant difference, especially when exploring new techniques.
Brands like Emily's Stitchery have become a reliable resource for stitchers looking to expand their creativity. Their curated collections focus on both usability and design, making it easier for beginners to get started while still offering variety for more experienced crafters.
For those interested in dimensional work, exploring a dedicated range of 3d needlepoint designs can provide inspiration and guidance, helping turn ideas into finished pieces.
Why This Craft Continues to Grow
The growing popularity of dimensional stitching reflects a larger trend in creative hobbies. People are increasingly drawn to activities that combine relaxation with hands-on creation.
3D needlepoint fits perfectly into this space. It offers:
- A mindful, stress-relieving process
- A sense of accomplishment
- The ability to create something unique and lasting
Unlike mass-produced décor, handmade pieces carry personal meaning and craftsmanship, making them truly special.
The shift from flat designs to structured creations marks an exciting chapter in the evolution of needlepoint. By exploring techniques that add depth and dimension, stitches can push the boundaries of traditional crafting.
Whether you’re experimenting with a blank needlepoint canvas or following a guided design, the journey into 3D work is both rewarding and creatively fulfilling.
With practice, patience, and the right materials, it’s possible to transform simple stitches into beautifully constructed pieces that stand out—literally and artistically.