Chimney Water Leak Lakeland: What to Do in the First 48 Hours After You Spot One
You notice it on a Tuesday morning: a damp patch on the ceiling by the fireplace, or a puddle on the hearth after last night’s storm. The instinct is to panic, or to ignore it and hope it dries. Neither helps.
What you do in the first two days won’t fix the root cause, but it can limit the damage, protect your claim options and make the eventual repair faster and cheaper. This guide walks through those first steps in order, then explains how to move from emergency mode to a permanent solution.
Hour One: Stay Safe and Stop the Spread
Keep Water Away From Electricity
If water is dripping near light fixtures, outlets, switches or a ceiling fan, turn off power to that area at the breaker. Don’t touch wet electrical components. A bulging, sagging ceiling can also hold a surprising amount of water, so keep people and pets out from under it.
Don’t Light the Fireplace
A wet flue and damp masonry shouldn’t be used until they’ve been checked. Moisture can mask other damage, and a damaged liner or blocked flue is a real safety concern. Skip the fire until a professional has had a look.
Contain What You Can
- Place a bucket or tub under active drips and put a towel beneath it to catch splashes
- Move furniture, rugs and electronics away from the area
- Lay plastic sheeting over items that can’t be moved
- If a ceiling is bulging, a small hole near the lowest point can release trapped water safely into a bucket, but only if you’re comfortable doing it and electrical risks have been ruled out
Hours Two to Six: Document Everything
Before you clean up, record what you see. This helps the repair company diagnose the problem and gives you a clear record if you decide to talk to your insurer.
- Take dated photos and short videos of stains, drips, the firebox, the ceiling and any damaged belongings
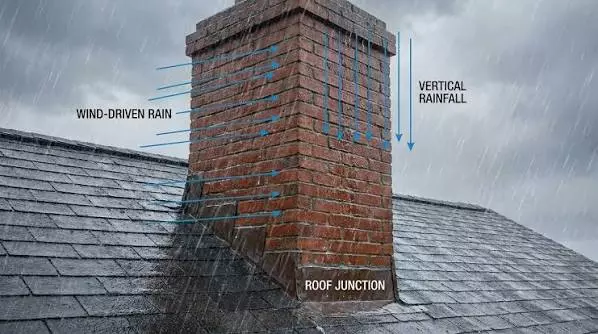
- Note the weather. Was it light rain, a heavy storm or wind-driven rain? This clue matters for diagnosis
- Write down when you first noticed it and whether it has happened before
- Photograph the roofline from the ground if you can see the chimney clearly, without climbing up
Different homeowner policies treat water damage differently, and I can’t tell you what yours covers. It’s worth reading the relevant sections or calling your insurer to ask how sudden versus gradual leaks are handled before you start permanent repairs.
Hours Six to Twenty-Four: Dry Things Out
Moisture left sitting in a home is the beginning of a second problem. Mold can start growing in damp, warm conditions in a matter of days, and Florida’s humidity makes it easier.
- Run fans and, if available, a dehumidifier in the affected room
- Open windows briefly during dry weather to move air
- Remove wet rugs, cushions and cardboard from the area
- Blot standing water rather than letting it soak further into flooring
- Check the attic if you can do it safely, since water often travels along framing before it shows up in a room
If drywall or insulation stays wet, it may need to be removed. A strong musty smell or visible dark spots suggests moisture is lingering and deserves a professional assessment.
Hours Twenty-Four to Forty-Eight: Find Out Where the Water Is Getting In
A chimney is a tall masonry structure with several places where moisture can enter. The source isn’t always obvious, and fixing the wrong spot just delays the real repair. Common culprits include:
The Chimney Cap
A missing, rusted or damaged cap lets rain fall straight into the flue. Water may run down the liner and appear in the firebox or the wall.
The Crown
The concrete or mortar slab on top of the chimney sheds water. Hairline cracks widen over time and let moisture seep into the masonry below.
The Flashing
This is the metal seal where the chimney meets the roof. When it lifts, rusts or loses its sealant, water enters at the roofline and can stain ceilings near the chimney.
Brick and Mortar
Porous brick and deteriorated mortar joints absorb water like a sponge. Signs include white powdery residue, flaking brick faces and crumbling joints.
The Flue Liner
Cracked or deteriorated liner sections can let moisture and condensation reach the surrounding masonry.
Condensation
Not every damp chimney is leaking from outside. Temperature differences and humid air can cause condensation inside the flue, especially if a liner is the wrong size or an appliance was changed.
Why Timing Matters for Your Chimney Water Leak Lakeland Repair
When you’re searching for chimney water leak Lakeland help, speed matters for practical reasons. Central Florida gets frequent, heavy rain through much of the year, so a leak that’s patched with a towel can reappear within days.
Each wetting cycle drives moisture deeper into masonry and framing, where it’s harder and more expensive to correct.
At the same time, a rushed fix is rarely a good one. The goal is a diagnosis that identifies the actual entry point, not a quick tube of sealant at the stain.
What a Good Professional Diagnosis Looks Like
When you call a chimney company, expect them to ask about the symptoms and then investigate several places rather than one. A careful visit typically includes:
- Exterior inspection of the cap, crown, masonry and flashing
- Interior inspection of the firebox, damper and smoke chamber
- Camera scan of the flue to check the liner
- Moisture clues such as staining patterns and the direction water appears to travel
- A written explanation of the cause, the proposed fix and the urgency
Some companies also use water testing, where a controlled stream is applied to different areas to reproduce the leak. It’s slower but can pinpoint hard-to-find entry points.
Temporary Measures: What Helps and What to Avoid
Reasonable Short-Term Steps
- A securely fastened tarp over the chimney top, if it can be done safely and without a rooftop climb by an untrained person
- Interior containment and drying as described above
- Keeping the fireplace unused
Things to Avoid
- Climbing onto a wet or steep roof. Falls are a serious risk
- Slathering sealant over cracks. It rarely lasts and can trap moisture inside masonry
- Painting over stains before the source is fixed
- Burning fires to dry the chimney out. Heat on wet masonry can cause damage
Read: How to Do a Chimney Inspection for Safer Heating?
Planning the Permanent Repair
Once the cause is identified, repairs usually fall into a few categories:
- Cap replacement or repair for missing or rusted caps
- Crown sealing or rebuilding depending on the extent of cracking
- Flashing replacement with proper layering and counter flashing set into the masonry
- Repointing to restore deteriorated mortar joints
- Brick replacement for badly spalled sections
- Liner repair or replacement when the flue is compromised
- Waterproofing treatment applied to breathable masonry, once underlying damage is fixed
A company that does both masonry and roof-edge work can often handle these together. If you’d like to see how this kind of work is typically scoped, a chimney leak repair process can give you a useful reference point when comparing proposals.
Questions to Ask Before Hiring
- How will you confirm the source of the leak?
- Do you inspect the whole chimney or just the area near the stain?
- Is the proposed fix permanent, or a temporary measure?
- What warranty covers the work?
- Will you document the findings with photos?
Answers that are specific and evidence-based are a good sign. Vague promises to “seal it up” are not.
Preventing the Next Leak
After the repair, a little routine maintenance goes a long way:
- Schedule a chimney inspection each year, ideally before the heavy rain season
- Have the cap, crown and flashing checked after major storms
- Trim overhanging branches and clear roof debris
- Fix small cracks early
- Keep copies of repair records and photos
If you’re still deciding what repairs make sense, learning more about professional chimney leak repair options can help you ask better questions.
Final Thoughts
A chimney leak feels urgent because it is, but it’s also a problem you can manage calmly. Stay safe, document what you see, dry the space, and focus on finding the real entry point instead of covering the symptom. A diagnosis-first approach costs less in the long run than repeated patches.